I have a few build reports for you in the coming month or so. In the meantime, this is a quick look at an interesting series of mini-PCs from ACEMAGICIAN, including one I ordered late last month and will be giving you some perspective on in this post.
As a disclosure, purchases through the links in this post may earn me a commission from Amazon’s affiliate program, and possibly a bonus from ACEMAGICIAN through Amazon from a bonus program they are offering through the end of 2024. I chose to purchase the computer itself out of my own funds, though, and neither Amazon, nor ACEMAGICIAN and its associated companies, have any say in the content of this post.
I also have another one to review for you soon. Acemagician is promoting a Ryzen 7 5700 model with more USB and some other different features. I’ll be writing that one up soon, and doing a bit more testing and benchmarking to compare them in the near future. Same caveats above, including paying out of my own pocket, apply to the newer one as well.
With that out of the way, let’s look at the computer itself.
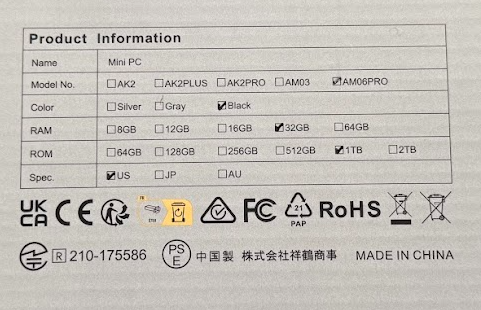
The machine I got, the AM06PRO with a Ryzen 7 5825U, 32GB RAM (2x16G), and a 1TB m.2 SATA SSD, came in pretty much the same packaging ACEMAGICIAN uses for most of their mini-PCs in the NUC/MacMini form factor. Specs are listed partially on the back, and at the time of my order, the computer was selling for $319 after checkbox coupon on Amazon. It’s currently unlisted, but there are 16/512 and 32/512 versions for under $300 on the page this link leads to.
I chose the 5825U over the 5800U options for a tiny bit of extra juice (2.00-4.50GHz for the 5825U vs 1.90-4.40GHz on the 5800U). Some benchmarks I read had the 5825U at as much as a 30% advantage in certain apps. It was one factor for me, along with the RAM and SSD specs for the price. As a regular desktop, a mini-server with Linux, home firewall/router, or even a USB-based NAS, either CPU should be fine for your needs.
Raspberry Pi boards have been intermittently available this year. They’re still very useful, but your odds of going into a retailer and picking up a few at list price are about as good as Ethereum hitting $5k this month. In other words, don’t hold your breath.
That being said, this type of single board computer is not completely unobtainable, even in today’s supply-chain-constrained market. Here are seven tips for finding the SBC of your dreams.
1. Check local retailers
This is a long shot, but for some people in some regions, it may still work. My local shop, Central Computers in Silicon Valley, has had them intermittently for a couple of months at reasonable prices.
2. Check official distributors
You can find sellers of the Pi boards on the official Raspberry Pi website. Stock may vary from day to day, and preorders may be possible, so check early and often if you’re pursuing this option.
3. Check Amazon
Right now, I see a number of shippable Pi 4 boards in 4GB and 8Gb on Amazon. They’re pricey, with the 4GB board around $144 and the 8GB board around $195. But if you have to have it for work, or if you’ve found a way to profit majorly from using one of these boards, it may be the way to go.
4. Consider kits
You may be thinking “I don’t need a power supply, a microSD card, a case, and all the other stuff,” but even when backorders weren’t considered, I saw starter kits with the Pi 4 board available in quantity at the above options. Right now, my local shop has the Okdo starter kit with the 8GB board for $160, limit one per customer. The bare board is $90 but out of stock, as are all of the standalone boards. So if you need access to a board soon (hopefully with someone else footing the bill), this is a very viable option.
5. Can I interest you in a Pi400?
The Raspberry Pi 400 computer is a Pi 4b equivalent in a different form factor. The board should have the same performance as a 4GB Pi4b, and even when boards and kits were unavailable, the Pi 400 was readily available in a standalone unit at about $80 or a kit with power adapter for $110. Prices on Amazon are a bit higher (like $120 for the standalone or $180 for the kit), but still lower than the 4GB standalone board mentioned at Amazon above.
You won’t be able to use your Pi cases or enclosures with the Pi 400, since it’s wider, but you can consider building your own stand or looking on Thingiverse and the like for 3d-printable enclosures for these boards.
See Jeff Geerling’s “Raspberry Pi 400 Teardown” blog post and video to see what’s inside and how you might be able to repurpose the board for your needs.
6. Check your local marketplaces for new or used boards
You may find some boards locally on Craigslist, Facebook Marketplace, Nextdoor, or the like. eBay is also an option, but it may or may not be local. As I write this post, I see boards in my extended area from $200-325 on Craigslist, and surprisingly $120 and up on Facebook. Someone is selling a complete 8-node cluster, including 6 8GB and 2 2GB boards (and power supply, network switch, tower case, etc) for $1000, which is pretty reasonable for the current market.
With these local marketplace options, be sure to buy locally, and if possible, try the board out before paying (if it’s not sealed). With eBay, read the ad carefully and be aware of buyer protections available to you.
7. Look into other small computer options
Raspberry Pi is the most famous card-sized board, probably with the longest run and best name recognition, But you can also look at things from the RockPi boards to ODROID, to LattePanda x86.
Intel NUC (NUC5PPYB/NUC5PPYH) on a 3d-printed stand with memory and HDMI dummy plug.
You may also be able to find bare board Intel NUC systems (like the remnants of the legendary Rabbit doors from a few years ago) that, while not exactly as tiny and requiring a bit more than 3-5 watts, may well do what you need.
For example, there are some i3 and even i7 boards here on eBay for as low as $95 shipped (searching under the “motherboard” category). When I searched under “Desktops & All-in-Ones” I found some of the old Rabbit boards (quad core Pentium with Gigabit Ethernet) for around $50 each. You’ll have to add a DDR3 SODIMM, a power supply, and probably storage of some sort, but even then you can get a 4GB system for around $100 or so.
NVI
If you don’t need an ultra-modern OS, you can also look into systems like the Jetson Nano (which I believe easily runs Ubuntu 18), or even Jetson TK1 (Ubuntu 14/16) from NVIDIA. These outdated boards are still quite interesting, and have many uses if you can “outsource” the security to a system with a newer platform.
And yet another option I found after posting this – Digital Loggers, a Silicon Valley company better known for their Ethernet-connected power controllers (mentioned in a previous post and used in my shop) are apparently the folks behind the AtomicPi Intel Atom-based single board computer. It takes a little bit more work to power, but for $50 you get a board based on the Atom x5-Z8350 1.44GHz CPU with 2GB RAM and 16GB EMMC on board, a breakout board, and an AI camera module.
Unlike the other boards mentioned, I have not tried this one, but it’s worth a look if you can handle the limitations and get your 5V 3A power into it yourself.
Where do we go from here?
I’m realizing I have a few boards that may be worth dusting off and using, or even selling. There’s a Pi 3b+ cluster in need of an expansion, and some other projects in the works for the upcoming holiday weekend.
What are you doing with single board computers, and have you found any tips and tricks I missed? Share in the comments!
This is another piece on a part of the Chia and cryptocurrency landscapes. See previous posts at https://rsts11.com/crypto
Need to set up a lightweight VPN to get into your low profile node remotely? Check out Stephen Foskett’s writeup on Zerotier. I’m using it on my Pi nodes to reduce NAT layers.
Many if not most Chia farmers run a full node on their farming / plotting machine. Some larger farms will use the remote harvester model, with a single full node and several machines farming plots on local storage.
If you’re using Flexfarmer from Flexpool, or just want a supplemental node (maybe to speed up your own resyncing, or to supplement decentralization on the Chia network), you might want a dedicated node that doesn’t farm or plot. And for that use case, you don’t really need dual EPYC or AMD Threadripper machines.
In fact, a well-planned Raspberry Pi 4B 4GB or 8GB system, with an external USB drive, will do quite well for this use. If you want to do a few forks as well, or another blockchain full node, a moderately-recent Intel NUC would do quite well for not much more.
So here we’ll look at three builds to get you going. Note that any of these can run a full node plus Flexfarmer if you want, or just a full node.
If you don’t already have Chia software and a full node installed, go ahead and install and sync the node on a full scale PC. it may save you five days of waiting. My original build for this use case was to test the blockchain syncing time from scratch.
Syncing from a semi-optimal Pi 4B from scratch took about 8 days, for what it’s worth. One member of the Chia public Keybase forum reported about 28 hours to sync on an Intel Core i5 12600k.
Caveat: Raspberry Pi boards are a bit more challenging to find and even harder to find anywhere near the frequently-touted $35 price point, or even under $150. And for Chia nodes, you want a minimum of the 4GB Pi 4B (8GB wouldn’t hurt). So while it’s possible to run on older hardware, it’s not recommended.
You might also be able to run on a Pi400 (the Raspberry Pi 4B in a keyboard case, which is much easier to find for $100 or so, complete). I plan to test this soon.
Raspberry Pi with external USB SSD.
This was my initial build, and today it’s running at the Andromedary Instinct providing an accessible full node for about 10-15 watts maximum.
As you saw in my 3D Printing series, after years of pondering a 3D printer, I was finally inspired to buy one when a pile of clusters came up on eBay from the defunct rabb.it video streaming service. In this series, I’ll take you through turning a rabbit door into some useful computing resources.
You can do something similar even after the clusters are sold out; a lot of people have probably bought the clusters and ended up not using them, so you’ll see boards on eBay or local marketplaces… or you can adjust the plans here to other models.
Update December 2021: This post languished in the drafts folder for about a year. I’ve updated links, and I’ll be reporting on some changes since the October 2020 launch of this cluster soon.
Let’s NUC this cluster out
Install memory, SATA cable, and SSD
Upgrade BIOS and set some annoying settings
Install your operating system
Set up central control
Install memory, SATA cable, and SSD
This is the least interesting part of the process, but you’ll need to do it before you can install an OS.
Start by loading the SODIMM of your choice onto the board. If you’re using an SSD like I am, you’ll connect the SATA cable to the black SATA connector next to the front USB stack, and the power cable to the beige connector perpendicular to the SATA connector. If you’re using a standard SD card, plug it into the SD slot to the right (as shown with the MAC address label). If you’re going with netboot (local storage? where we’re going we don’t need local storage!), just connect your network cable.
Upgrade BIOS and set some annoying settings
I created a bootable FreeDOS USB drive with Rufus, a common free software product used to create bootable USB media from ISOs (think Linux, Windows, etc). From there, we get the latest BIOS from Intel’s Download Center and place the file on the bootable drive. (Further BIOS instructions available on Intel Support.)
Update: There is a September 2022 BIOS update (0081) I just discovered in December 2022. I had originally installed BIOS update 0079 released April 20, 2020. You’ll need to search for NUC5PPYH even though the board’s model is PPYB.
Connect a monitor and keyboard, plug in the bootable drive, and apply power (or just reset the board). Use the F7 key to go into onboard flash update and load the BIOS file from the flash drive, or choose to boot from the flash drive and use the DOS-style flasher from there.
When you’ve done the upgrade and the system has rebooted, go into the BIOS with the F2 key and choose BIOS default values. Then go into the menus to enable all the USB ports (for some reason the default is to enable ports 1-3, leaving physical port 4 and header ports 5-6 disabled) as well as the SATA port if you are using that for storage. I’d also check the boot order (move net boot down in preference or disable outright if you don’t plan to use it). You can choose other settings as desired, and then press F10 to save and reboot.
Install your operating system
The easiest way to roll out the NUC side of the door would be to netboot an installation infrastructure like Cobbler. One of the first things I did when I went to work for the Mouse 10 years ago was setting up Cobbler for a deployment of RHEL 5.5.
Sure enough, Cobbler is still a thing, with very recent updates. I was able to get partway there this time and then, after several dozen runs to the garage and back to power cycle nodes, I gave up and installed from local media.
For CentOS 8, I did a manual install booting from a Rufus-created USB drive, with the SSD installed. I configured my storage and network options by hand, as well as user and root credentials. This left an “anaconda.ks” kickstart file on the installed system, which I copied to a second flash drive.
For the additional systems, I plugged both the CentOS 8 installer and the drive with the kickstart file into the NUCs and booted from USB. I ran into some strange storage issues with the drive not being blank, despite having chosen the kickstart option. Ideally, you would boot from the USB installer, it would find your kickstart config, and just roll out the software without intervention from there.
After that, if your DHCP server doesn’t assign hostnames you like, you can go in and set hostnames with hostnamectl or the like.
Set up central control
If you use a configuration management platform like Ansible, Puppet, Chef, cfengine, or the like, you’ll want to set those up at this point.
I’ve gone with the lightweight method so far, with shared SSH keys from a management host (an Intel NUC with CentOS on it, originally intended to be the cobbler server).
Use ssh-keygen to create your key files, and then ssh-copy-id can be used to push out the keys to your hosts. Then look into a more manageable option.
Where do we go from here?
As I finish this post in December 2021, a year after the original build, I’m looking at going back and making a few changes to the cluster to bring it up as a Kubernetes platform.
With the demise of CentOS as many of us know it, I’m planning to replace the installed OSes with Ubuntu LTS. I’m planning to test out some cryptocurrency cpu-based mining, and run Kubernetes platform(s) on it as well, and bring my second door up to speed (the RAM has been sitting in a box in the living room for a year now).
There’s a chance I’ll even do some lightweight Chia farming, using either bus-powered USB hard drives or some of the extra power connectors from the fused expanders for standard Seagate externals.
For those of you who have bought and built up these doors, what did you do with them? Feel free to share details and blog post links in the comments. I’ll put interesting ones into the body of this post as I see them.
Just one more thing
One much later update – if you’re looking for one of the posts that inspired this 3d printed build, it’s “What in the NUC have I done?” from Reddit a few years back. The 20mm/25mm spacers are the key detail, and I’ve found it hard to find this post again looking for mixes of m2.5 20mm 25mm 30mm nuc nuc5 nuc5ppyh nuc5ppyb rabb.it spacer standoff etc. Now when I come back to look for it again in a year or two, I’ll hopefully find it here where I left it.
And yes, that means I have another project in mind. I think I know where my 8GB dimms for the second set of NUCs is, and I’m ready to give up on the TK1 boards, so that means 15 NUCs in one stack. Stay tuned, and be patient. Or don’t.
Pricing disclaimer: All prices, availability info, and links are accurate as of the writing of this article (May 3, 2021) unless otherwise noted. Prices vary from day to day and availability does too. Use this info with a grain of salt especially if you are reading this in 2022 or beyond.
Here’s a quick rundown of what was involved in the process.
Shopping List
Feel free to shop in your preferred venues online or locally, or if you already have components, use them. These links are Amazon affiliate links, and if you use them, I get a few bucks to go toward my next hardware adventure. (I bought my NUC and RAM from Central Computer, a local computer store in Silicon Valley, and the NVMe drive came from Amazon.)
Base computer – NUC10i7FNH1 currently $570 at Amazon. You want the i7, and you want the FNH which is the “high” case that holds a 2.5″ drive as well as the m.2.
RAM – 32GB (2x16GB) DDR4 2666 or better SODIMM. Crucial 16GBx2 kit around $182 at Amazon. You can install 64GB, but you probably don’t need it with this processor.
Boot drive – I used a Samsung PM851 that’s not available on Amazon at the moment. Any 2.5″ SATA drive will do, even a HDD. Amazon has the WD Blue SSD 250GB for $45 or 500GB for $60. If you have something else on hand that’s at least 120GB, go ahead and use it, or if you want some internal plot storage, get something bigger.
Plotting drive – 2TB Inland Premium NVMe is popular with its 3200TBW rating, about $240 on Amazon but out of stock for the next week. If you watch your drive life, you can use cheaper NVMe or even SATA m.2 storage. But check the TBW (Total Bytes Written, or Terabytes Written) and warranty for your drive and take that into account.
OS install drive – Get a USB 3.0 drive with 16GB or more space, and use Balena Etcher or Rufus to burn Ubuntu 20.04 LTS to it.I like the Sandisk Ultra 32GB for price point and quality, about $10 at Amazon.
External long-term plot/farm storage – I’ll be using an 8TB external drive in the near term, but you can use whatever you have, even NAS storage.
Bonus: Staging disk. A user on r/chia suggested using a staging drive to copy your final plot file to, so that your plot process ends faster than if it has to be copied to slow disk. You can then automate moving the plot files to your external HDD at your leisure, and get back to plotting again up to an hour faster. For this, you can use an external USB 3.0 or better SSD like the WD My Passport SSD ($150 for 1TB), Crucial X8 ($148 for 1TB), or pretty much any SSD that will hold a batch of your plots (1TB will hold 9 plot files). You can also use a directory on your NVMe drive for this, but make sure you don’t let it fill up.


 Feel free to shop in your preferred venues online or locally, or if you already have components, use them. These links are Amazon affiliate links, and if you use them, I get a few bucks to go toward my next hardware adventure. (I bought my NUC and RAM from Central Computer, a local computer store in Silicon Valley, and the NVMe drive came from Amazon.)