As most of you know, I try to keep work-specific stuff off the blog whenever possible. Yes, my Cisco UCS primer post is still one of my top three[1] blog posts of all time, but it was written before I applied to Cisco the first time around, if memory serves. Of course, it was DDR3-1600 memory back then, so….
Anyway, my friend Craig Simpson pinged me on Linkedin the other day asking if there was anything going on with UCS these days. And, sure enough, there is. I originally gave him a few links, but when he wanted to throw them up on his blog, I offered to write something a bit more exciting than links.
I don’t want to spoil it, but if you’re a fan of UCS Mini or AMD processors, or both, you’ll want to check it out here:
I will give you one spoiler here though: Up to 2048 cores, 48TB of RAM, and 734TB of storage in 7U of rackspace. And those numbers will go even higher soon.
Thanks to Craig for accepting the idea of a guest blog post, and thanks to you, my readers, with whom I should have some new non-work-related stuff to share later.
[Edited as I’d had the wrong Craig’s last name in there.]
[1] My top three posts of all time, so far, in terms of page views at least.
[This post was originally teased on Medium – check it out and follow me there too.]
[Update: As of April 2023 I’m an employee of Cisco again, with access to the employee discounts, and I’ve started rolling back to a Meraki plant. I’ll eventually write a post detailing the reasons and choices I made, but it’s taken a while to get back to it.]
I’m a big fan of Meraki, but now that I haven’t been an employee of Cisco for over two years*, I no longer have the free license renewals or the employee purchase discounts on new products and licenses. So October 28, 2022, was the end of my Meraki era. (Technically a month later, but I needed a plan by October 28 just in case.)
The home network, mostly decabled, that got me through the last 4-5 years.
I needed a replacement solution that wouldn’t set me back over a thousand dollars a year, and my original plan was to use a Sophos SG310 either with the Sophos home firewall version or PFsense or the like. I even got the dual 10gig module for it, so that I could support larger internal networks and work with higher speed connectivity when the WAN links go above 1Gbps. I racked it up with a gigabit PoE switch with 10gig links, and now a patch panel and power switching module.
But I didn’t make the time to figure it out and build an equivalent solution in time.
How do you solve a problem like Omada?
Sometime in early to mid 2022 I discovered that TP-Link had a cloud-manageable solution called Omada.
It’s similar in nature to Meraki’s cloud management, but far less polished. But on the flip side, licensing 12 Omada devices would cost less than $120/year, vs about $1500/year (or $3k for 3 years) with Meraki. So I figured I’d give it a try.
The core element of the Omada ecosystem is the router. Currently they have two models, the ER605 at about $60-70, and the ER7206 at about $150. I went with the ER605, one version 1 without USB failover (for home, where I have two wireline ISPs), and one version 2 model with USB failover (for my shop where I have one wireline ISP and plan to set up cellular failover).
You’ll note I said cloud-manageable above. That’s a distinction for Omada compared to Meraki, in that you can manage the Omada devices individually per unit (router, switch, access point), or through a controller model.
On-site or virtualized software controller, free, self-managed
Cloud-based controller, $9.95 per device per year (30 day free trial for up to 10 devices I believe)
I installed the software controller on a VM on my Synology array, but decided to go web-based so I could manage it from anywhere without managing access into my home network.
Working out the VPN kinks
The complication to my network is that I have VPN connectivity between home and the shop across town. I also had a VPN into a lab network in the garage. Meraki did this seamlessly with what you could call a cloud witness or gateway – didn’t have to open any holes or even put my CPE into bridge mode. With Omada, I did have to tweak things, and it didn’t go well at first.
I was in bridge mode on Comcast CPE on both ends of the VPN, and did the “manual” setup of the VPN, but never established a connection. I tried a lot of things myself, even asked on the Omada subreddit (to no direct avail).
I came up with Plan B including the purchase of a Meraki MX65. I was ready drop $300-500 to license the MX65 at home, MX64 at the shop, and the MR56 access point at home to keep things going, with other brands of switches to replace the 4-5 Meraki switches I had in use.
As a hail-mary effort, I posted on one of the Omada subreddits. The indirect help I got from Reddit had me re-read other documentation on TP-Link’s site, wherein I found the trick to the VPN connectivity – IKEv1, not v2. Once I made that change, the link came up, and the “VPN Status” in Insights gave me the connectivity.
The trick to the manual VPN connectivity was IKEv1, not v2
The last trick, which Meraki handled transparently when you specified exported subnets, was routing between the two. I had to go to Settings -> Transmission -> Routing and add a static route with next hop to the other side of the tunnel. Suddenly it worked, and I was able to connect back and forth.
Looking at the old infrastructure
My old Meraki network had 12 devices, including three security appliances, four switches, a cellular gateway, and four access points. The home network used the MX84 as the core, with a MS42p as core switch, a MS220-24 as the “workbench” switch on the other side of the room, and a MS220-8P downstairs feeding the television, TiVo, printers, MR42 access point, and my honey’s workstation, connected via wireless link with a DLink media access point in client mode. I also had a MS510TXPP from Netgear, primarily to provide 2.5GbE PoE for the Meraki MR56 access point.
There was a SG550XG-8F8T in my core “rack” (a 4U wall-mountable rack sitting on top of the MS42p switch) but it was not in use at the time – I didn’t have any 10GBase-T gear, and the MS42p had four 10GbE SFP+ slots for my needs.
The garage lab had a SG500XG-8F8T behind the Z1 teleworker appliance. TP-Link powerline feeds that network from the home office.
The remote shop had a MX64, MS220-8P, and MR18, as well as the MG21E with a Google Fi sim card.
So there was a lot to replace, and complicate in the process.
Looking at the new infrastructure
The new core router is the TP-Link ER605, feeding the MS510TXPP switch for mgig and 10gig distribution (including WiFi), with another downlink to a TL-SG2008P switch ($90 at time of purchase) which offers 4 PoE+ ports and integrated monitoring with Omada.
The ER605 has front-facing ports, so I have those cables going into the patch panel to connect Internet uplinks and the PoE switch. On the SG2008P, ports are on the back and LEDs are on the front, so I have all 8 ports going to the patch panel and they feed things from there.
The MS510TXPP has downlinks to the powerline network, a SG500-48X switch across the room connected by 10 Gigabit DAC, and a few other things in the office.
I have the wireless needs fulfilled by a Netgear Nighthawk router in AP mode, and a TP-Link Omada EAP650 access point that needs some tuning. I expect to replace the Nighthawk with the EAP650 at some point, and I have a Motorola Q11 mesh network kit coming soon which could replace much of the wifi in the house.
The downstairs network is still fed by the DLink wireless bridge (as a client of the Nighthawk), but now it has a random Linksys 8 port switch serving the first floor needs.
The garage lab still has the SG500XG, bridged via powerline, and very limited hardware running due to California electric prices.
In the shop, I have the ER605v2, feeding a random 8-port TP-Link unmanaged switch for now. I’m thinking about getting an Omada switch there, and I recently installed a UeeVii WiFi6 access point (acquired through Amazon Vine, review and photos here) which is more than enough to cover the 500 square feet I need there.
Why’d it take so long to post?
I had found an Etsy seller who made 3d printed rackmount accessories, and I ordered a cablemodem mount, router mount, and a 5-port keystone patch panel. I ordered December 15, shipping label was issued December 21, and I expected it right after Christmas. Alas, after a month and two shipping labels being generated, I had no gear and no useful response from the seller, so I got a refund and went with rack plan B.
I took a 14″ 1U rack shelf like this one (but fewer slots and about half the price) and used zip ties to attach the router and 8-port switch to it. Not a great fit, but inside the CRS08 carpeted rack it’s not so visible.
Where do we go from here?
Right now the networks are stable, except for no wifi in the garage and occasional wifi flakiness in the house. So my next steps will be fixing the home wifi, and probably moving another AP to the garage (possibly even setting up a wireless bridge to replace the powerline connection).
I am looking at some more switching, possibly upgrading the Omada switch to replace the Netgear at home, and then take the existing 8 port Omada to the shop to provide more manageability (and PoE+) over there.
The front runners for the new switch right now are the SX3008F (8 port SFP+ at $230; 16 port SX3016F is $500), SG3428X (24 port gigabit, 4 port SFP+), and the SG3210XHP-M2 (8 port 2.5GbE copper PoE + 2 SFP+ slots at $400, pretty much the same as the Netgear except with no 5GbE ports).
There are a couple of other options, like the $500 SSG3452X which is equivalent to the MS42p, but I’ll have to consider power budget and hardware budget, and what I can get sold from the retired stash this month to further fund the expansion.
I also need to work out client VPN to connect in to both sites. I had client VPN on my travel laptop to the shop for a couple of years, but haven’t tried it with the new platform yet.
TP-LInk supposedly has a combination router/controller/limited switch coming out this year, the ER7212 which also offers 110W PoE across eight gigabit ports. It’s apparently available in Europe for 279 Euros. Hopefully it (and other new products) will be released in the US at CES Las Vegas this week.
I was going to bemoan the lack of 10G ports, but then I saw the ER8411 VPN router with two SFP+ ports (one WAN, one WAN/LAN). Still doesn’t seem to support my 2.5Gbit cable WAN, but it’s at least listed on Amazon albeit out of stock as of this writing.
As many of my readers know by now, my time at Cisco came to an end last month. When I decided to leave Disney and come to Cisco 6 1/2 years ago, there were two main things I knew I would miss about being in the “real world” — Disney cast member discounts, and being a Tech Field Day delegate.
Well, there’s no change on the Disney discount front, but this week I’ll be back as a TFD delegate for Tech Field Day 22 the latter half of this week.
Riding in the limo at SFD5 in 2014 – four of the five people pictured will be at TFD22 this week with me
How did you get to this point?
In May 2014, I posted a two part post on storage vendors (“These 3 hot new trends” part 1 and part 2) from Storage Field Day 5, my last full event as a delegate. A month later, I moved to San Francisco for most of a week thanks to TFD sponsors, to participate in my second Cisco Live event and to interview for a position with Cisco.
I was offered the job the day I got home from the event, and a little under a month later I got badged at Building 9 and began the 6+ year adventure in mega-vendor sales engineering. But as a vendor, I wasn’t terribly welcome among the Tech Field Day delegations, although I was still invited to the parties, and managed to qualify for the roundtable at SNIA’s Storage Developer Conference in 2017. I did continue my participation with Interop over the years, leaving my Cisco ears (instead of my Disney ears) at home, and even attending a Cisco briefing during one of the events, in the former Playboy Club at the Palms in Las Vegas.
What is Tech Field Day? Do I need a ham radio?
If you’re new to Tech Field Day, the idea is pretty much the same as it’s been for over ten years, even if the participation venue has moved from conference rooms to Zoom. Stephen Foskett, founder of Tech Field Day and Gestalt IT, brings together independent analysts, practitioners, geeks, and javelin catchers to meet with companies producing something in the tech sphere.
From the huge established names (like Dell, HPE, Cisco) to companies just coming out of stealth and talking to the public for the first time, you get to see companies facing unstaged questions in realtime, discussing the product or service, the decisions behind them, and how people who might actually use the product or service see it rather than how the company’s marketing and PR team want it to be seen.
And unlike most press conferences and analyst events, anyone on the planet (pretty much) can tune in, watch and learn, and pose their own questions through social media to be answered. There’s no registration required, no event fees, and if you missed a company you can go back and watch within a couple of days.
Pro-tip: If, like me, you’re on the tech job market, Tech Field Day’s archives can be a great resource for learning about companies you might be interested in working for. Just go to the main page and search for a company name. Not everyone is in there, but you can get a good feel for the companies that are, from what they do and how they’ve evolved over the years to how well they understand their product and the market they’re competing in.
So what’s different for you this time?
Tech Field Day 9 in Austin, Texas (June 2013)
After five full delegate events in person, and seven roundtable/TFD Extra events (details), I’ll be back as a different kind of delegate, for obvious reasons. TFD22 looks to be the largest event yet, with twenty-five delegates. No, really, 25 delegates. The nine presenting companies will be split up into early and late shfits to accommodate delegates from around the world, and since none of us are traveling to an in-person location, we can focus on presentations in our own time zones… and some of us will be hopping onto the other shift’s events as well.
The early shift, for my European and Eastern colleagues, will feature Commvault, Veeam, VMware, Quantum, and Red Hat. Their sessions run from 5-10am Pacific, and while I’d love to see them live, I’m not sure 5am is a time I believe in just yet.
You’ll find me in the late shift (11am-3pm Pacific), meeting with MemVerge, Riverbed (who I last visited here in Sunnyvale for SFD2), Illumio, and oddly enough, Cisco. I only see three names among the other 24 who I’ve shared TFD events with, but about half of them are in my online circles and I’m looking forward to meeting the others.
If you’d like to watch along with us, check out the TFD page for livestreams on several platforms starting Wednesday morning, December 9th. You can click on this garishly-large TFD logo to get there if you like. And if you miss the sessions you wanted to watch, they’ll be posted on the same link within a couple of days for you to watch at no cost.
Feel free to follow along on Twitter and ask your questions – tag with the hashtag #TFD22 and the delegates will try to relay your questions to the presenters.
Hi folks. The pile of project boxes in my home lab has gotten taller than I am, so when a Twitter follower asked me about running VMware vSphere on one of the systems not too far down in the stack, I took the challenge and said I’d try to get it going to see what I could report back.
Disclosure: While my day job is with Cisco, this computer was purchased out of my own pocket and used no proprietary/employee-only access to software or information. I do not provide end-user support for Cisco gear, nor do I recommend using used/aftermarket gear for production environments.
That system is a now-discontinued Cisco UCS C22 M3S. Yes, C22, not C220. It was an economy variant of the C220, more or less, with a lower cost and lower supported memory capacity as I recall. The one I have features a pair of Intel Xeon E5-2407 v2 processors (quad core 2.4GHz) and 48GB of RAM. The RAID controller is LSI’s 9220-8i, and for now I have a single 73GB hard drive installed because that’s what I found on my bench.
This is a standalone system, even though it’s sitting underneath a UCS 6296 Fabric Interconnect that’s freshly updated as well. I have the two on-board Gigabit Ethernet ports as well as a 4-port Gigabit Ethernet add-on card. And by way of disclosure, while I do work for Cisco and probably could have gotten a better box through work, I bought this one in a local auction out of my own pocket.
Warming up the system
The first thing I needed to do was make sure firmware, management controller, and so forth were up to date and usable. Cisco has long followed the industry standard in servers by making firmware and drivers freely available. I wrote about this back in 2014, when HPE decided to buck the standard, even before I worked for Cisco. You do have to register with a valid email address, but no service contract or warranty is required.
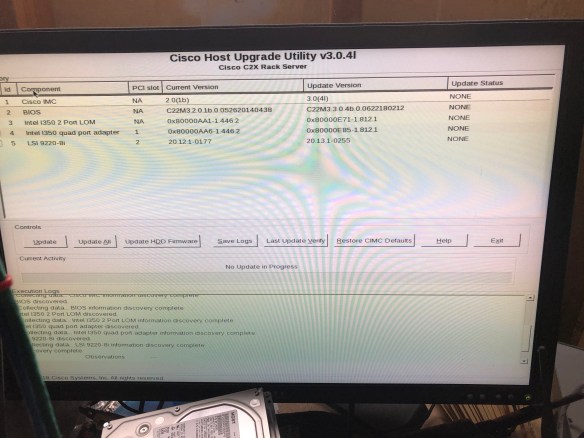
Since I was going to run this machine in standalone mode, I went to the Cisco support site and downloaded the Host Update Utility (HUU) in ISO form.
Updating firmware with the Host Update Utility (HUU) ISO
I loaded up Balena Etcher, a program used to write ISO images and other disk formats to USB flash drives. USB ports are easy to come by on modern computers, but optical drives are not as common. I “burned” the ISO to a flash drive and went to boot it up on the C22.
No luck. I got an error message on screen as the Host Update Utility loaded, referring to Error 906, “firmware copy failed.”
Doing some searching, I found that there were quirks to the bootability of the image. A colleague at Cisco had posted a script to the public community site in 2014, and updated it in 2017, which would resolve this issue. So I brought up my home office Linux box (ironically a HPE Microserver Gen8 that I wrote about in January), copied the script and the iso over, and burned the USB drive again with his script. This time it worked.
Recovering a corrupted BIOS flash image with recovery.cap
Alas, while four of the five firmware components upgraded, the BIOS upgrade was corrupted somehow. Probably my fault, but either way I had to resolve it before I could move forward.
Corrupt bios recovery, before and after
Seemed pretty obvious, and I figured the recovery.cap file would have been copied to the flash drive upon boot, but I figured wrong. You have to extract it from a squashfs archive inside the HUU ISO file. There’s even a ‘getfw’ program in the ISO to do this. Easy, right?
Of course not.
Turns out newer versions of OpenSSL won’t decrypt the filesystem image and extract the needed file, and even my year-out-of-date CentOS 7 box was too new. So I spun up a VM with the original CentOS 7 image and extracted there.
Get the HUU for your system and UCS version (don’t use a C22 BIOS on a C240 or vice versa, for example).
Mount or extract the ISO file
Copy the GETFW/getfw binary out
Unmount the ISO file
./getfw -b -s <HUU ISO FILE> -d .
This will drop a “bios.cap” file in the current directory. Rename it to “recovery.cap” … put it on a flash drive (plain DOS formatted one is fine), put it into the system, and reset your machine. You’ll go from the first screen with “Could not find a recovery.cap file..” to the second screen transferring to controller. And in a few minutes, your system should be recovered.
Preparing to boot the system
This is the easiest part, in most cases, but there are a couple of things you may have to modify in the Integrated Management Controller (IMC) and the LSI WebBIOS interface.
Set your boot order. I usually go USB first (so I don’t have to catch the F6 prompt) followed by the PCIe RAID card. The RAID card will only show up if supported and bootable drives are installed though. This can be changed on the fly if you like, but I prefer to do it up front.
Check your RAID controller settings. Follow the BIOS screen instruction for going into WebBIOS (the text interface to configuring the RAID card), and make sure that you have disks presented in virtual drives. I had plugged a UCS drive and a random SSD in and only the UCS drive (a 73GB SAS drive) showed up. It did not appear to the F6 Boot Order menu though, as it was not set bootable in WebBIOS. A few key taps fixed this, and the drive appeared. Again, you can change the boot order after installing, but why not do it first?
Moving forward with VMware installation
This is the easy part, more or less. I went to VMware’s site and grabbed the Cisco custom ISO (which should have current drivers and configurations for Cisco components, especially the RAID controller and network cards). You can also install with the standard vSphere installer if you like.
I burned the 344 MB ISO to a flash drive, finding again that Etcher didn’t like it (complaining not being a bootable ISO) but Rufus did. With a Rufus-burned 8GB drive (choose “yes” to replace menu.c32 by the way), I was able to install the vSphere system and bring it up.
On first install attempt, I did see this message for about a second, and had no drives show up.
Turns out this error warns you that log files are not stored permanently when booting from a USB installation drive, and it was unrelated to the missing drives (which didn’t show up because I originally had an unconfigured SSD and no configured drives installed–see previous section to resolve this).
But when I had the hard drive configured, the install went smoothly.
It is somewhat funny that I’m working with 48GB of RAM and only 60ish GB of storage at the moment, but from here I was able to copy over my OS installation ISOs (8GB over powerline networking made it an overnight job) and bring up my first VM on the new system.
So where do we go from here?
For now, the initial goal of confirming that vSphere will install neatly on a C22 M3 with the 9220-8i RAID controller has been accomplished.
Next up, adding some more storage (maybe SSD if I can find something that will work), maybe bumping the RAM up a bit, and doing something useful with the box. It only draws 80-100 watts under light use, so I’m okay with it being a 24/7 machine, and it’s quiet and in the garage so it shouldn’t scare the neighbors.
If you’re looking to turn up an older Cisco UCS server in your home lab, get familiar with the software center on Cisco.com, as well as the Cisco Community site. Lots of useful information out there as well as on the Reddit /r/homelab site.
Have you rescued old UCS servers for your homelab? Share your thoughts or questions below, or join the conversation on Facebook and Twitter.
‘I could tell you my adventures—beginning from this morning,’ said Alice a little timidly: ‘but it’s no use going back to yesterday, because I was a different person then.’
–Lewis Carroll, “Alice’s Adventures in Wonderland
I was invited to guest-blog on MapR’s site recently, in preparation for a webcast I’m doing next week with their VP of Partner Strategy, Bill Peterson. MapR is known for a highly technical blog, but I’ve learned and shown that even technical things can be a bit entertaining now and then.
So, after a turn of phrase that brought Lewis Carroll to mind, you can go see a couple of Alice references and, in a strange sort of way, how they fit my evolution into storage administration–not entirely unlike my evolution into business intelligence and big data and most of the other stuff I’ve ever made my living at.
Disclosure: I work for Cisco; these blogs (rsts11 and rsts11travel) are independent and generally unrelated to my day job. However, in this case, the linked blog post as well as the referenced webinar are part of my day job. The humor is my own, for which I am solely responsible, and not at all sorry.
Links updated March 20, 2017, due to MapR blog site maintenance.
Links updated to Internet Archive February 14, 2024, due to MapR website going away with HPE acquisition years ago.


 So where do we go from here?
 Next up, adding some more storage (maybe SSD if I can find something that will work), maybe bumping the RAM up a bit, and doing something useful with the box. It only draws 80-100 watts under light use, so I’m okay with it being a 24/7 machine, and it’s quiet and in the garage so it shouldn’t scare the neighbors.

_-_c03757_07.jpg)