I have a few build reports for you in the coming month or so. In the meantime, this is a quick look at an interesting series of mini-PCs from ACEMAGICIAN, including one I ordered late last month and will be giving you some perspective on in this post.
As a disclosure, purchases through the links in this post may earn me a commission from Amazon’s affiliate program, and possibly a bonus from ACEMAGICIAN through Amazon from a bonus program they are offering through the end of 2024. I chose to purchase the computer itself out of my own funds, though, and neither Amazon, nor ACEMAGICIAN and its associated companies, have any say in the content of this post.
I also have another one to review for you soon. Acemagician is promoting a Ryzen 7 5700 model with more USB and some other different features. I’ll be writing that one up soon, and doing a bit more testing and benchmarking to compare them in the near future. Same caveats above, including paying out of my own pocket, apply to the newer one as well.
With that out of the way, let’s look at the computer itself.
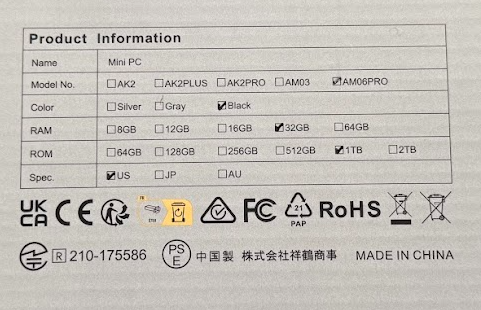
The machine I got, the AM06PRO with a Ryzen 7 5825U, 32GB RAM (2x16G), and a 1TB m.2 SATA SSD, came in pretty much the same packaging ACEMAGICIAN uses for most of their mini-PCs in the NUC/MacMini form factor. Specs are listed partially on the back, and at the time of my order, the computer was selling for $319 after checkbox coupon on Amazon. It’s currently unlisted, but there are 16/512 and 32/512 versions for under $300 on the page this link leads to.
I chose the 5825U over the 5800U options for a tiny bit of extra juice (2.00-4.50GHz for the 5825U vs 1.90-4.40GHz on the 5800U). Some benchmarks I read had the 5825U at as much as a 30% advantage in certain apps. It was one factor for me, along with the RAM and SSD specs for the price. As a regular desktop, a mini-server with Linux, home firewall/router, or even a USB-based NAS, either CPU should be fine for your needs.
I’m a bit embarrassed to have let rsts11 drift most of the year. For what it’s worth, I’ve dug out some project machines, and I may have acquired one or four in the last couple of months, so I’m planning to bring you some build logs and reports to entertain and edify you heading into the holidays.
From a ThinkStation M920x one-liter tiny PC that can take a 40 Gigabit Ethernet adapter, to a HP Z6 G4 workstation that a vendor recently called a “real chonker,” I have some fun stuff to review for you. And I’m finally making use of some RTX 3000-series GPUs that have been useless for crypto mining for years.
Wherever possible, I’ll help you find the bits to build or upgrade your own, but in most of these cases (heh) I started with a machine at least partly built up. Check your local marketplaces to see what people are building and selling locally, and you may find an interesting configuration you hadn’t thought of.
Below are teasers of three of the machines I’ll be working on. The Machinist system was purchased locally, while the other two were from eBay.
An HP Z6 G4 workstation, supporting first and second gen Xeon Scalable processors and up to 768GB of DDR4 memory. It shares something in common with Dell’s T5800 and some other Precision workstations from my past. Ketchup is not used as thermal paste, and the dust bunnies were blown out into the wild.. An upgrade to a quirky Machinist X99 PR9 system in a red custom case – E5-2695v4, and a current complement of 128GB DDR4 registered RAM. One downside to used PCs is they can sometimes come with bonus fragrances. My third BOXX workstation, with the ASrock Z390 Taichi, an i7-9700K due for upgrade to my first i9 processor, custom liquid cooling, and some likely memory upgrades. Continue reading →
Since the early days of the Pandemic, I’ve pondered a review-focused site. It’s a way to share some of the gadgets and useful items I’ve acquired, recommend interesting products to my readers, and maybe make a little bit of money when people buy through my affiliate links.
I invited a friend to take a lightly-paid role contributing reviews. He never got around to taking me up on it, because of various reasons, and I never got around to starting it.
JOTMT already has four pre-loaded reviews, and I’ll be adding more over the coming months. Readers of this blog will not be surprised to find I acquire and talk about a lot of tech gadgets, and one of the first four posts is about a tech gadget (or three, to be more accurate). But I’ll be covering other things. There’s already a $60 deodorant, a flashlight with a Splunk connection of sorts, and a DC-powered pellet smoker.
My goal is to write about interesting things, and give perspectives on things that might entice you to try something you didn’t know you needed. I have a box of Thunderbolt 4 cables in my home office that largely aren’t worth a blog post, for example. But the one with a built in power meter, or the one that coils up like a well-trained snake for desktop storage? Those might be worth reading about. A silicone ice tray probably isn’t as interesting as an icemaker.
Start out with the welcome post, “It’s a website with reviews, comparisons, and projects,” over at jotmt.com. And stay tuned for more reviews, and some larger goals that may incorporate a few things, like a solar battery project or a mini-PC cluster.
[Updated 2023-11-12 for farming experience and PoE splitter] [Updated 2023-11-22 for Pi 5 4GB plot time and case experience]
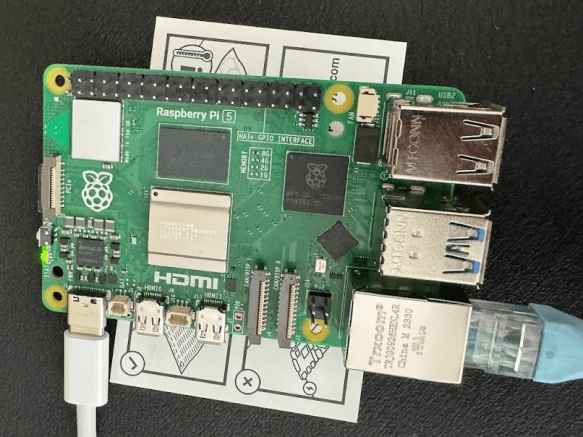
I was on the waitlist for Raspberry Pi 5 8GB at my local computer shop, Central Computer. I had to go in to get a cooler for a new machine I am going to be building this month, and at the checkout I asked if they had any Pi 5 boards left, thinking I’d play with a 4GB board if they had any left.
“We’ve got 4GB and 8GB, which would you like?”
Well, of course, 8GB.
I already had a couple of cases coming from Amazon in preparation, and a 5V4A PSU (the 5V5A one for full power with the new Pi is already hard to come by), and a fresh MicroSD card from my last visit to Central, so I was ready to go.
I was planning to wait a while at first, but someone on one of the Chia Discords asked about Pi5 for Chia, I took the challenge on.
I’ve started work on a walkthrough of Chia farming from download to payout. It’s turned out to be a bit more challenging than I thought, but I’m still plowing through.
This video (below) is NOT the walkthrough. It is a quick overview, with an hour of sped-up node syncing. Three hours to get the last four weeks synced… not very fun but it makes a point, and gets some content up on the Andromedary Instinct YouTube channel.
Why does this matter? Well, syncing the blockchain to your node is necessary to plot and do transactions (there may be workarounds for both, but the usual path is to sync a full node and then start farming). That’s a pretty slow process.
On a very well-tuned farmer with great network and I/O, I suspect you can get a node synced in a day or so. Last time I synced from scratch on a Raspberry Pi, I believe it was 11 days, and would be longer today. The machine in this video took three hours to sync 4 weeks of activity, and that skips over the dust storm phase of the blockchain (which effectively knocked a lot of slower nodes offline until Chia Network did some software enhancements to better deal with dust storms).
By using BitTorrent to grab a snapshot (about 65GB compressed, 125GB uncompressed) in a few hours, you skip closer to the front of the line in syncing status. You can then “resume” syncing from the start of July and even on a suboptimal machine like my test machine, you’ll be done in under a day.
This video also shares one of the better guides to moving your database directory. In my case, the boot drive it was originally syncing to is a 256GB drive, and it would eventually fill up the drive. I moved it off to a second SSD so that the boot drive won’t degrade.
Building that system, and what I’d do differently
I realized as I started plotting (heh) the video flow that it would be easier to start with a fresh computer. I had another use for an Alder Lake-based machine coming up, and I managed to get a complete system new in open box for $250 locally, so I went for it. As configured, it cost me less than $500, but if I were building it for long term Chia use without “free” review stock from Amazon Vine, I’d make a few other changes.
Bill of Materials, as built ($537 with caveats)
HP Pavilion TP01-3016, i5-12400, 12gb RAM – $250 on Facebook Marketplace with smaller NVMe boot drive
This HP desktop system maxes at 32GB RAM, so plotting may be limited even with a GPU. However, for storage it’s pretty good, with two 5GBit USB-A ports, two 10GBit USB-A ports, and one 10GBit USB-C port on the front (in addition to two USB 2.0 ports on the back). The board supports two SATA drives with power connectors plus the NVMe. And it’s not a bad CPU – 6 P-Cores with hyperthreading.
Once I finish the video, I’ll be swapping out the boot drive for a better one to install Ubuntu and Arweave on. I still prefer running my node databases on moderate to good performance NVMe over an economy SATA drive whenever possible.
Some other options for plotting and farming systems
This HP desktop build met my primary criterion – ability to get a system cheap and quick and local to set up Chia from the ground up. But as noted above, it’s not perfect, and has definite limits (like one x1 and one x16 PCIe slot, only two SATA drives, 32GB max RAM).
I have two T7910s, and even though they’re several years old, they have a lot of expandability and performance while being fairly manageable in size, shape, noise level, and power draw.
This one has two E5-2695v4 processors and 512GB RAM included. You can branch out into compressed plots and/or RAM-based plotting, both of which will accelerate your plotting. With several x16 PCIe slots and either 4 3.5″ or 8 2.5″ drives (not sure which is the case on this system), you can expand with GPUs, storage adapters, internal SAS/SATA drives, or even faster networking.
My primary plotter is still a T7910 with two E5-2650Lv4 (14c28t) processors and 128GB RAM, plus a RTX3060 GPU
If you’re looking for a slightly different config, there are a number of options with different mix of CPU, RAM, and storage at the Amazon Renewed store.
Another alternative is to go a bit more modern with a T7920, which uses first gen Xeon Scalable processor instead of the Xeon E5 v4 line. There are a fair number of first gen Xeon Scalable gold processors for double digit prices on eBay in case you start with a silver or bronze level processor.
Mini PCs, primarily for farming or uncompressed plotting
There are a lot of NUCs and NUC-Class systems out there. I’ve got systems from ACEMAGICIAN, GEEKOM, and Beelink in the home lab/studio, as well as my classic Chia NUC plotter, the NUC10i7FNH from a couple of years ago.
These are not very expandable in terms of interfaces or GPUs, but with Thunderbolt you could use a Thunderbolt Hub to attach additional USB hubs and drives, or a Thunderbolt PCIe enclosure to attach a SAS card or GPU.
At some point, however, if you’re looking at expanding your NUC or mini-PC that much, though, you may want to consider either a NAS or a desktop/workstation/server with SAS enclosures to handle the drives.