Hi folks. The pile of project boxes in my home lab has gotten taller than I am, so when a Twitter follower asked me about running VMware vSphere on one of the systems not too far down in the stack, I took the challenge and said I’d try to get it going to see what I could report back.
Disclosure: While my day job is with Cisco, this computer was purchased out of my own pocket and used no proprietary/employee-only access to software or information. I do not provide end-user support for Cisco gear, nor do I recommend using used/aftermarket gear for production environments.

That system is a now-discontinued Cisco UCS C22 M3S. Yes, C22, not C220. It was an economy variant of the C220, more or less, with a lower cost and lower supported memory capacity as I recall. The one I have features a pair of Intel Xeon E5-2407 v2 processors (quad core 2.4GHz) and 48GB of RAM. The RAID controller is LSI’s 9220-8i, and for now I have a single 73GB hard drive installed because that’s what I found on my bench.
This is a standalone system, even though it’s sitting underneath a UCS 6296 Fabric Interconnect that’s freshly updated as well. I have the two on-board Gigabit Ethernet ports as well as a 4-port Gigabit Ethernet add-on card. And by way of disclosure, while I do work for Cisco and probably could have gotten a better box through work, I bought this one in a local auction out of my own pocket.
Warming up the system
The first thing I needed to do was make sure firmware, management controller, and so forth were up to date and usable. Cisco has long followed the industry standard in servers by making firmware and drivers freely available. I wrote about this back in 2014, when HPE decided to buck the standard, even before I worked for Cisco. You do have to register with a valid email address, but no service contract or warranty is required.
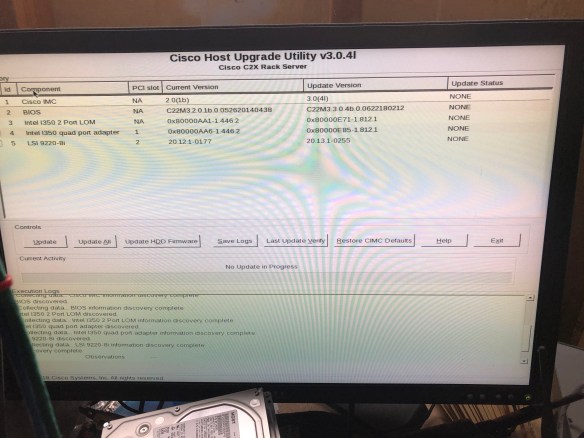
Since I was going to run this machine in standalone mode, I went to the Cisco support site and downloaded the Host Update Utility (HUU) in ISO form.
Updating firmware with the Host Update Utility (HUU) ISO
I loaded up Balena Etcher, a program used to write ISO images and other disk formats to USB flash drives. USB ports are easy to come by on modern computers, but optical drives are not as common. I “burned” the ISO to a flash drive and went to boot it up on the C22.
No luck. I got an error message on screen as the Host Update Utility loaded, referring to Error 906, “firmware copy failed.”
Doing some searching, I found that there were quirks to the bootability of the image. A colleague at Cisco had posted a script to the public community site in 2014, and updated it in 2017, which would resolve this issue. So I brought up my home office Linux box (ironically a HPE Microserver Gen8 that I wrote about in January), copied the script and the iso over, and burned the USB drive again with his script. This time it worked.
Recovering a corrupted BIOS flash image with recovery.cap
Alas, while four of the five firmware components upgraded, the BIOS upgrade was corrupted somehow. Probably my fault, but either way I had to resolve it before I could move forward.

Corrupt bios recovery, before and after
Seemed pretty obvious, and I figured the recovery.cap file would have been copied to the flash drive upon boot, but I figured wrong. You have to extract it from a squashfs archive inside the HUU ISO file. There’s even a ‘getfw’ program in the ISO to do this. Easy, right?
Of course not.
Turns out newer versions of OpenSSL won’t decrypt the filesystem image and extract the needed file, and even my year-out-of-date CentOS 7 box was too new. So I spun up a VM with the original CentOS 7 image and extracted there.
- Get the HUU for your system and UCS version (don’t use a C22 BIOS on a C240 or vice versa, for example).
- Mount or extract the ISO file
- Copy the GETFW/getfw binary out
- Unmount the ISO file
- ./getfw -b -s <HUU ISO FILE> -d .
This will drop a “bios.cap” file in the current directory. Rename it to “recovery.cap” … put it on a flash drive (plain DOS formatted one is fine), put it into the system, and reset your machine. You’ll go from the first screen with “Could not find a recovery.cap file..” to the second screen transferring to controller. And in a few minutes, your system should be recovered.
Preparing to boot the system
This is the easiest part, in most cases, but there are a couple of things you may have to modify in the Integrated Management Controller (IMC) and the LSI WebBIOS interface.
Set your boot order. I usually go USB first (so I don’t have to catch the F6 prompt) followed by the PCIe RAID card. The RAID card will only show up if supported and bootable drives are installed though. This can be changed on the fly if you like, but I prefer to do it up front.
Check your RAID controller settings. Follow the BIOS screen instruction for going into WebBIOS (the text interface to configuring the RAID card), and make sure that you have disks presented in virtual drives. I had plugged a UCS drive and a random SSD in and only the UCS drive (a 73GB SAS drive) showed up. It did not appear to the F6 Boot Order menu though, as it was not set bootable in WebBIOS. A few key taps fixed this, and the drive appeared. Again, you can change the boot order after installing, but why not do it first?
Moving forward with VMware installation
This is the easy part, more or less. I went to VMware’s site and grabbed the Cisco custom ISO (which should have current drivers and configurations for Cisco components, especially the RAID controller and network cards). You can also install with the standard vSphere installer if you like.
I burned the 344 MB ISO to a flash drive, finding again that Etcher didn’t like it (complaining not being a bootable ISO) but Rufus did. With a Rufus-burned 8GB drive (choose “yes” to replace menu.c32 by the way), I was able to install the vSphere system and bring it up.
On first install attempt, I did see this message for about a second, and had no drives show up.

Turns out this error warns you that log files are not stored permanently when booting from a USB installation drive, and it was unrelated to the missing drives (which didn’t show up because I originally had an unconfigured SSD and no configured drives installed–see previous section to resolve this).
But when I had the hard drive configured, the install went smoothly.

It is somewhat funny that I’m working with 48GB of RAM and only 60ish GB of storage at the moment, but from here I was able to copy over my OS installation ISOs (8GB over powerline networking made it an overnight job) and bring up my first VM on the new system.
 So where do we go from here?
For now, the initial goal of confirming that vSphere will install neatly on a C22 M3 with the 9220-8i RAID controller has been accomplished.
 Next up, adding some more storage (maybe SSD if I can find something that will work), maybe bumping the RAM up a bit, and doing something useful with the box. It only draws 80-100 watts under light use, so I’m okay with it being a 24/7 machine, and it’s quiet and in the garage so it shouldn’t scare the neighbors.
If you’re looking to turn up an older Cisco UCS server in your home lab, get familiar with the software center on Cisco.com, as well as the Cisco Community site. Lots of useful information out there as well as on the Reddit /r/homelab site.
Have you rescued old UCS servers for your homelab? Share your thoughts or questions below, or join the conversation on Facebook and Twitter.