
For the last couple of years I’ve brought you recommendations for preparing for your summer conference season. For the first time since 2013 I will not be at Cisco Live, but I will be back at Interop in Las Vegas in May, and will probably have a late August visit for the Cisco sales kickoff.
Items that I discuss here may have referral or affiliate links. These usually provide a modest monetary benefit to me, which (perhaps obviously) goes back into items to review for the blogs here and at rsts11travel.com. You can also check out the “support” page to see other ways to support rsts11.
Personal comforts
A couple of perennial tips that have saved me a lot of inconvenience outside of the technical side of things may help you too.
First, break in your shoes in advance. I often think about new shoes before an event that will involve a lot of walking. Having learned the hard way, I now start buying, and breaking in, new shoes at least a couple of weeks ahead of an event. Your feet will be much more comfortable with a few 5000-10000 step days rather than days at a trade show where you might break 5000 steps in an hour. While you’re at it, make sure you have a spare charger for your fitness tracker, and put it in your laptop bag now.
-

- H2GO FORCE steel water bottle
-

- Vapur Element collapsible water bottle
-

- Nomader collapsible water bottle with sleeve
Second, bring a sturdy but convenient-to-carry water bottle (or buy one once you get there). There will be water everywhere you go, but those little 8 ounce plastic cups only go so far, especially if you stroll down the Las Vegas strip. Whether you choose something like the metal H2GO FORCE 17oz ($20ish at Amazon, a personal favorite since it fits in my Saturn Sky’s DDMWorks cupholders), the Vapur Element roll-up water bottles (from $12 at Amazon), or Nomader’s collapsible reinforced water bottle ($25 at Amazon), you’ll be prepared to refill and stay hydrated indoors or out. Many of the Strip hotels sell the H2GO Force or one like it in their gift shops for around $25 (I have one from Delano, and one from a Ritz-Carlton outside Vegas).
You can also choose to reuse a substantial bottle. On my last three-day trip I bought a $5 bottle of Evian in an airport shop and just refilled it along my journey. It fit nicely in my backpack bottle sleeve, and I recycled it when I got home.

Third, if you’re planning to get a lot of swag at the trade show or conference, consider printing a prepaid label and bringing a USPS flat rate box. You can get the boxes free at most US Postal Service post offices, or from their website. You can even get postage for the flat rate box at the post office if you prefer not to print at home. Maybe do two, and if you don’t need both, you can cancel for a (delayed) refund when you get home.
And fourth, consider bringing (or buying on site) some portable relatively-weatherpoof snacks and beverage additives if you’re into those things. Some granola or cereal bars, instant beverages, or even an electrolyte like Drinkwel’s LyteShow (which I use along with LyteCaps when traveling as well as at home).
Power to the People
The most important thing for me during a conference is power. I usually have a laptop, a phone, and a tablet, and sometimes more than one of each, but I’m rarely seated near a wall outlet. I generally carry an enhanced extension cord and a battery pack to support my device needs.
-

- Anker 26800 PD charger
-

- ZMI QB820 USB-PD charger with case
-

- Native Union Smart Hub Bridge
Last year I recommended the Anker 26800 USB-C Power Delivery Battery Pack ($120 at Amazon with USB-PD wall charger and cables plus travel pouch included) and the ZMI 20000 USB-C Power Delivery Battery Pack ($70 at Amazon with cables and storage pouch included, rapid charger currently $20 at Amazon). I also suggested the Native Union SMART HUB BRIDGE extension cord which gives two AC outlets and 5.4V of USB charging across four ports, up to 3A per port, including 15W USB-C ($55 at Amazon).
Any of those would still be a good choice this year, and the prices have remained consistent. But this year I have two devices to suggest in addition.
If you have a Macbook, a USB-C Chromebook, or another small Ultrabook other than Dell, the two packs and the charger above will charge your device nicely. Unfortunately, Dell has quirky power delivery support, so the Anker will not charge at all, and the ZMI will give a slow charge warning. Better than nothing, but I’ve found some new options.
-

- RAVpower PD Pioneer 20100
-

- Anker PowerStrip Pad
-

- Anker PowerPort Cube
The RAVpower PD Pioneer 20100mAh battery pack, currently $56 at Amazon before a $4 instant coupon, provides 45W of power over USB-C Power Delivery, as well as supporting 18W quick charge on the USB-A port. I’ve tested it with my XPS 13 9370, and it charges nicely. It also rapid-charges my iPad Pro 12.9 (2015) at ~28W, which is excellent as well. If you’re charging a laptop with USB-C, you won’t have use of the USB-A charging port, but for smaller devices you can double-up. Charging input on USB-C is 30W, which means you can recharge in 3.5 hours. [Disclosure: RAVpower provided me with a free unit of this pack to test, and I reviewed it on their Facebook group May 8.]
I’ve also added the Anker PowerStrip Pad and PowerPort Cube to my travel complement. Neither of these will charge the XPS laptops, but they have AC outlets for the Dell charger.
The PowerStrip Pad ($36 at Amazon) has a 5 foot attached cord, two AC outlets, 2 switchable USB-A “IQ” 12W (5V 2.4A) smart charging ports, and a USB-C Power Delivery port that offers 30W (20V 1.5A or 15V 2A). The USB-C port will rapid charge iPhone 8 and later.
The PowerPort Cube ($26 at Amazon) offers a 5 foot attached cord, three AC outlets, and three 18W (5V 3.6A) max USB-A ports. For the newer Apple devices or your computers, you’d want to use an AC charger with this one, but you’ll have room away from the wall to plug in with either of these extension options.

By the way, If you’re traveling with an IOS device like the iPhone 8 or anything newer, by the way, I highly recommend Anker’s PowerLine II USB-C to Lightning charging cables. The 3ft version is $16 on Amazon, available in black or white, and sturdier than the Apple cable while still being MFI certified and ready to rapid-charge even your largest iPad Pro. The 6ft version is coming in June for about $20, and gives the same sturdiness and power potential with twice the length.
If you’re looking for a wall charger to supplement the above extensions (and charge up the batteries and your devices), check out my review of the Anker PowerLine II cable. There are six adapters listed there that I’ve personally used. You might have one or more already, and that post may give you an idea of what to look for if you choose to get something else.
With current prices, those six suggested power adapters are:
- Anker PowerPort Atom PD 1 (30W GaN PD charger, non-folding plug, $29.99)
- RavPower PD Pioneer (45W GaN PD charger, folding plug, $54.99)
- Monoprice Obsidian Speed (45W PD charger, folding plug, $16.99 from the maker)
- Apple 30W USB-C Power Adapter ($43, not pictured)
- Apple 61W USB-C Power Adapter ($60, not pictured)
- Apple 87W USB-C Power Adapter ($79, not pictured)
Where Do I Put All This Stuff?
I have no shortage of luggage, from a Waterford Executive Folio (from $89 direct from the maker) for my iPad, to my checked-bag Samsonite 8-wheelers. But I’m finding that my regular travel fits well with a couple of pretty easy choices.
-
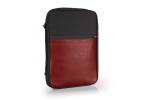
- Waterfield Executive Folio
-

- Solo Duane 15.6 Briefcase
-
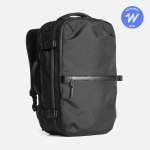
- AER SF Travel Pack 2
First, for a laptop bag I’m still liking the Solo Duane 15.6 Hybrid. It’s a briefcase-style bag that holds 15.6″ laptops (including my Thinkpad P51 juggernaut) along with an iPad (like the 12.9 I use as a daily driver with a keyboard case) and power adapters, chargers, magazines, and other gadgets. It converts from briefcase to messenger bag (with detachable strap) to backpack (with stowable straps) and fits under most airline seats. I have the slate one ($50 at Amazon) but the gray one is only $37 as I write this.
My sub-1-week preference remains the AER SF Travel Pack. The new version (Travel Pack 2, $230 direct from the maker) has some additional features, but I still find the original to be great for up to a week of carefully curated clothing and toiletries. There’s a laundry or shoe pocket in the bottom, laptop sleeve that easily handles even the Thinkpad mentioned above, a lot of useful pockets, and straps to keep everything together.
Where do we go from here?
Off to a conference, of course!
If you’re looking for an accessory suggestion that’s not covered above, leave a comment and I’ll see what I can do.
And by way of additional disclosure, while I do get a commission from Amazon on many of the items above (unless mentioned as “from the maker”), I am not recommending anything I have not personally purchased (or otherwise received) and used for travel purposes. Also, no vendor has paid for, previewed, or requested inclusion in this post. It’s all based on what will be in my luggage (or what will be my luggage) this summer and fall.

 Aye, there’s the rub. The iPad Pro came with a 12 watt USB-A charger like iPhones did, and a USB-A to Lightning cable like iPhones did. It’s what Apple had available, and it would probably recharge your iPad Pro in 4-6 hours. (As you can see on the right, mine hasn’t left the box in about 3 years.)

 And if you want to see what power profile your charger is negotiating, regardless of which charger or cable you use, I’ve used the


 PortaPow is a UK company that came to my knowledge for their charge-only / data blocker cables. These cables block/bridge the data lines in a USB charging cable, letting you charge (potentially) faster while keeping a host or charging device from spuriously accessing the data on your device.