
Getting Started with Cryptocurrency Mining – Building Your First Rig

This is a post I’ve started three or four times, with different aims and detail, but since I haven’t gotten it posted and people keep asking, I thought I’d start with a simple build plan and some caveats and considerations.

Where I refer to a ‘rig’ here, it’s simply a system dedicated to, or purposed for, mining cryptocurrency of some sort. It might be a single board computer, or a dedicated device, or a PC with one video card (or just a good cpu), or an open frame build with lots of GPUs and a beefy power supply.

Big Hairy Audacious Caveats

The numbers in this article, from prices to currency rates, are based on the time of writing (which may have been a while before the time of posting). They are not guaranteed to last even as long as it takes for this article to post. I am not advising on the value or prospects of any mining or cryptocurrency. You may gain money, lose money, or break even, or your entire city may sink into the ground like a big ole glowing gopher, if you engage in cryptocurrency mining on any level. Do so at your own risk. 

Other Reading

See the sidebar: A note about mining pools

See the other sidebar: Setting up your cryptocurrency wallet

Givens and Druthers

Two ODROID HC1 single board computers, next to a Transporter NAS device.

There are a lot of options out there, from multi-thousand-dollar ASIC miners for Bitcoin to sub-$50 single board computers that can mine Verium or the like. Your budget will determine a lot of the details of your rig, and your power cost may influence it as well. It’s also worth keeping family approval requirements in mind, since an Antminer may be noisy and generate a lot of heat, whereas a Raspberry Pi or ODROID might fit better behind something in your living room.

You can build a starter rig with one GPU, and depending on the GPU, you might be able to bring in $10-20 a week or more from that. Considering that you can do this with an existing PC and operating system, it may be an economical way to get your feet wet, and it won’t require messing with special power supplies, excessive cooling, or riser cards.

If you’re looking to impress people or make a lot of money, well, good luck. But you’ll be looking at open frame systems with riser cables or even multiplexers for PCIe. That’s beyond the scope of this post. Continue reading →
Sidebar: Setting up your cryptocurrency wallet

Aside

This is a sidebar post; you may wish to read the main mining rig post first.

Depending on the currency you choose to mine, you may need to create a wallet and/or address to receive the proceeds. The way this works will vary across currencies, but they’re very similar.

Wallets are usually a copy of the blockchain for your currency, along with the keys and address for your own “account” in the currency. It’s sort of an odd configuration if you compare to modern banking, but it serves the dual purpose of tracking your own balance and strengthening the security and scalability of the network. Continue reading →

Sidebar: A note about mining pools

Aside

This is a sidebar post; you may wish to read the main mining rig post here first.

One thing I didn’t cram into my earlier post on getting started on cryptocurrency mining was how you actually make money (or fail to). To figure this out, we will look at the two ways you can mine cryptocurrency.

Drawing the Pool Picture

The “classic” method is what we’ll call solo mining. This means you’re looking for blocks on your own. If you find a block, you get the whole reward for yourself. For Bitcoin, this could be over $100k in one fell swoop. However, unless you have $100k or more in custom mining hardware (ASIC miners like the Antminer S9), your odds of finding a block on your own are miniscule at best.

The more confusing method is called pool mining. This means you contribute the work your miner does to a collective, who share out the rewards when the collective pool finds a block. If you’re the lucky block-finder, you get a LOT less reward than if you solo-mined that block, but the other 99.999999985% of the time (scientifically chosen random nearly 100% number) you’re getting a lot MORE than if you solo-mined and didn’t find anything.

You could think of mining in this situation as similar to taking a metal detector out to the Atlantic or Pacific beach looking for gold or other treasure. There’s a lot of shoreline and beach, and if you go out with one metal detector (or even two, one in each hand), you can only cover so much space. Take 10, 100, or 150,000 friends with their metal detectors and you have a better chance of finding something and sharing the reward. Continue reading →

Coming back to the NetBeez monitoring service – a gigabit agent and more

[Disclosures at the end, as usual. Also, since this post was begun, NetBeez has announced discontinuation of their free tier of service. There is still a 30-day trial, though, so if you’re looking at deploying a paid option, you can still try it out first.]

At Cisco Live this year, I won a NetBeez monitoring agent (in the form of a Raspberry Pi 2 model B). It took a couple months, but I finally got it plugged in and running. NetBeez were kind enough to offer me an expanded license for a couple of devices, so I could run them from my home, my workshop, and possibly even a mobile rig.

See the previous article for how I started using the gear, and why I wanted to upgrade almost as soon as I got the first agent going.

B is for Banana – Pro, that is

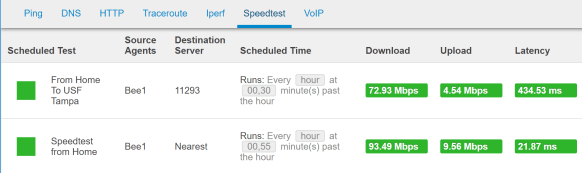
With a 200mbit+ connection at home, and a 100mbit Ethernet port on my agent, I hit an obvious bottleneck.

Luckily, though, I’d stocked up on a couple of Banana Pi Pro devices, and had a Raspberry Pi 3 Model B as well. Since the only device I have a case for is the Banana, that’s what I ran with. I later realized the Raspberry Pi 3 is also a 10/100 device, so it would not fix the problem, although it worked fine as an agent on my backup DSL connection (which maxes at 20Mbps). Continue reading →

First look: Checking out the Netbeez cloud-based monitoring service

[Disclosures at the end, as usual. Also, since this post was begun, NetBeez has announced discontinuation of their free tier of service. There is still a 30-day trial, though, so if you’re looking at deploying a paid option, you can still try it out first.]

At Cisco Live last year, I won a NetBeez monitoring agent (in the form of a Raspberry Pi 2 model B). It took a couple months, but I finally got it plugged in and running. NetBeez were kind enough to offer me an expanded license for a couple of devices, so I could run them from my home, my workshop, and possibly even a mobile rig.

I’ll admit that I wasn’t completely sure what I would do with the agent, but once I got it going, I found a lot of utility in the offering.

Getting Started

If you want an utterly painless way to get started, win a pre-built monitoring agent at an event. The second closest option to that would be buying a preloaded agent from NetBeez.

However, for most of my readers, loading an OS onto a device you’ve had sitting in a pile in the corner of your lab or spare room is going to be as easy and a bit cheaper. NetBeez offers options for Debian Linux, OVA bundles for the virtualization platform of your choice, Raspbian for Raspberry Pi, and an Odroid C2 Debian image. There are probably other options you can work out if you put your mind to it, but it’s not much of a hindrance to getting going.

With any of these options, you’ll run an agent setup script with your secret code in it, given to you in an email (or in their dashboard once you’re set up–click on the gear icon in the top right of your dashboard). Then it should show up promptly in the NetBeez dashboard, and you can rename, configure, add targets, etc.

What I’m Monitoring

The first tests I put in were pointing at my home router (a Meraki MX84, see disclosures), and my remote workshop router (a Meraki MX60).

For my home router, I have a ping to the router’s internal interface, and a DNS lookup for one of the Meraki Cloud sites I would use to manage the Meraki environment. This validates internal connectivity and general DNS availability.

For the remote workshop router, which is connected over VPN, I check ping and http response to the internal interface of the router (which validates VPN connectivity), and ping and traceroute to the external interface (which validates Internet connectivity). Continue reading →