New hardware thoughts for home labs (Winter 2013)

It’s been almost two years since I wrote my first home lab post, on the occasion of rolling a Shuttle SH67H3 VMware server. Since then, I’ve rambled on Twitter about a lot of other options, and figured I would bring some of them to your more-easily-searched-for attention.

I will update this post in the near future – most recent update 2013-12-12 – so you can look (probably at the bottom) for new details and references.

Disclosure: I’m not paid or coerced to promote the items in this post. Anything I own below was bought with my own money. Most of it probably will not blend. Any references to vendors or manufacturers are based on my experience and not any consideration from the company.

Many of the links are to Amazon.com, and if you buy through them, I get a small commission credit to spend on more coffee gear or some of the same things. I appreciate your support and suggestions.

My lab cluster today

I recently bought two batches of rackmount servers at absurd prices. We’re talking less-than-the-memory-was-worth prices. For now, I have an NEC Express 5800/120Rh-1 (dual E5405/16GB) and a HP DL365 G1 (dual-core Opteron 2214HE/16GB) running 5.5. vCenter Server is running on my NUC i3 box out of convenience. When I get some more PC2-5300F RAM, I’ll switch out that Opteron for another Xeon to get a bit more consistency.

The downside to this environment is that it’s noisy and a bit power-hungry. At rest, the two servers use about 400W. So until I upgrade the UPS, I’m a bit stuck on that level of server.

But the upside is that the two servers as configured cost less than I spend on coffee in a month at home. And my lab is in a location that isn’t as sensitive to power load or noise as my home office might be.

Using a Dell Poweredge C6100 for dense rackmount computing

There are a lot of 1u and 2u rackmount servers out there on Craigslist, eBay, Weird Stuff, and such venues. I’ve picked up various HP boxes for chump change and scrounged for memory, so it is an option. You can probably get a dual socket 8-core server (DL160, DL360, DL365, DL380, DL385) with some memory and drive trays for under $100 until you run out of power outlets. If your tolerance for power draw and noise allow, that’s definitely a cost-effective way to go.

C6100

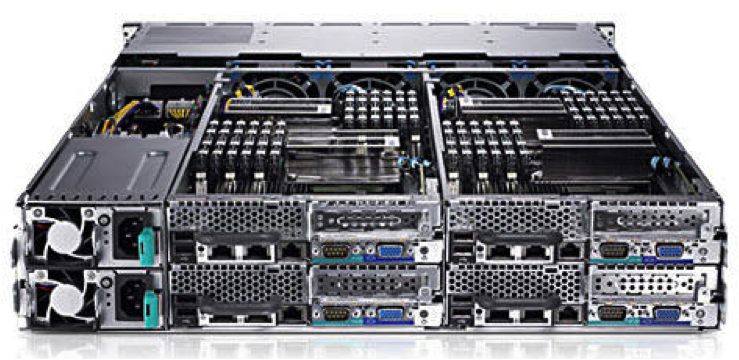
There are also a lot of Dell C6100 “blade” servers (pictured above) out there as well. These are 2u enclosures with up to 4 two-socket nodes. Each blade can take 12 DIMMs (up to 192GB), two quad or hex core Xeon processors, and 3 LFF 3.5 drives or 6 SFF 2.5 drives (SATA, SAS, SSD). And from what I’ve read, you can run four dual-L5420 blades at about 300W.

I’m seeing these priced at around $750 for a two-L5520-node config, or a four-L5420-node config, with minimal RAM. You can find a four-L5520-node config for around $1k, or you can add extra nodes later. ServeTheHome has a thread on community update findings, including fan improvements and internal USB.

I don’t know what the noise level is out of the box, but hopefully one of my readers can chime in. Or I may pick one up next month and come back with an update.

Ye Olde HP Proliant Microserver… And Ye Newe Microserver

I have a Proliant Microserver N40L in my environment. It, and its siblings N36L and N54L, are classic home lab servers, with secret BIOS tweaks and undocumented memory upgrades and a $200-300 price tag. Much like the NUC, they are, but perhaps a bit less processing power and a lot more expandability.

Microserver Gen 8

Well, HP released their Microserver Gen 8 this summer, with two dual-core Pentium processor options. One option has a G1610T 2.3GHz processor, and the other has a G2020T 2.5Ghz processor; there’s even a stackable 8-port switch to match. You still get four non-hot-plug SATA bays; the new ones offer a glitzier front door and a laptop-size optical drive bay. You also get dual gigabit Ethernet and a dedicated iLo port.

The price has gone up with the specs; you’re looking at $450-500 for the base 2GB/250GB system, plus your upgrades, so probably $700 with 16GB of RAM.

Be sure not to purchase the Windows Server bundles (unless you’re into that sort of thing). The Microserver Gen 8 shows up in bundles between $700-1200 with various Windows licenses included, and if you’re throwing your own OS on afterward, there’s no reason to shell out the extra money.

NUC NUC… not again…

Intel has added new Next Unit of Computing (NUC) models to their line, with 4th generation i3/i5 processors. There’s an i3-4010U model and an i5-4250U model available. Perhaps obviously, they’re no longer fanless or silent, but probably quieter than the options above.

Wilson Canyon NUC with USB

You still need to add your power cable, some laptop memory (8GB or 16GB depending), an mSATA module if you want internal storage, and a flash drive to boot from. So you’re probably looking at about $600 for a complete system, give or take. But if space is of an essence, and your workloads can handle 16GB dual core modules, this is a great option.

As an aside, Intel has 4th generation NUCs with support for an internal 2.5″ drive. These don’t seem to be as commonly available, but it’s something to watch for if you need more internal storage.

A surprising contender – Dell’s Inspiron 660 desktop

I was having an exchange on Twitter with someone looking for options with Gen 3 PCI Express for virtualization lab use. He ended up getting an Inspiron 660 desktop, which has more convenient expansion options than pretty much everything above.

The i5-3340 model with 8GB of RAM comes in under $600 on Amazon (you can buy it directly from Dell but might get quicker delivery from Amazon). You should be able to load it up with 16GB of RAM, and you can get 4x and 6x SATA (and 4x SAS) drive bay inserts to get dense 2.5″ drive deployments. Probably won’t need that DVD burner on a hypervisor platform, will you?

What else can I read about home lab options?

I’m glad you asked. One thing that pushed me to write this post was Chris Wahl’s update on his home lab. He’s moving to Haswell, and building out a well-optimized lab. He’s an avid advocate of remote management, so definitely take a look at his board selection if you need remote control of your server.

Simon Seagrave at TechHead has a lengthy write-up on the Microserver Gen 8 that’s worth a look if you’re leaning that way.

2013-12-12: Erik Bussink has built a compact lab with the Shuttle XH61V that finds a happy medium between my Shuttle and NUC builds.

2013-12-12: A friend on Facebook reported in with Benjamin Bryan’s blog about installing a Xeon E3 in the HP Microserver Gen 8. This may be the best reason to go with the low-end G1610T model.

2014-01-14: Greg Schulz (@storageio on Twitter) has a new post today on some of his recent discoveries and acquisitions. Check out Dell Inspiron 660 i660, Virtual Server Diamond in the rough? for a surprising choice for virtualization.

If you’ve written a blog post about sub-$1k home lab servers, feel free to let me know and I’ll try to get you added to this list. I’m happy to exchange links and spread the joy of home lab adventures.

A quick word on VAAI and FreeNAS/TrueNAS

[I have a lot of stuff in my head to tell you all about, but I also have a thousand square feet of inventory and storage to move an average of two miles this weekend… so keep an eye out for more lengthy posts coming later in the month. ]

I’m helping a friend’s startup get some infrastructure built, and one of the things I’m looking at is shoring up their VMware environment. They’re not ready for any of the common sub-six-letter names that usually come up for a vSphere storage platform yet… even a Celerra is overkill for five developers, I’d have to say.

So I was looking into VAAI support on the TrueNAS appliances from iXsystems (and of course FreeNAS itself). The first three search results I found were actually this blog, some cached twitter roll comments where I said I didn’t know if TrueNAS/FreeNAS supported VAAI.

truenas-search-rsts11

Well, I got it on good authority this afternoon that VAAI support is in the plans for FreeNAS over at iXsystems. There’s no current date for when it will be released, but they’ve jumped through a number of flaming hoops already to get ready, and will be keeping me (and you all by extension) up to date on progress.

For those of you using FreeNAS in your home lab, this probably won’t stop you from using it as shared storage for your VMware lab environment, or anything else for that matter. But if you’re considering TrueNAS for VMware storage, or need the full-on VAAI feature set, this will make things smoother in the foreseeable future.

And an unsolicited and uncompensated plug here (although if they want help testing a FreeNAS Mini Plus, they know where to find me)…

iXsystems are a hardware vendor who are a good friend to open source. They’re probably best known for their support of FreeBSD and FreeNAS (and Jordan Hubbard is joining them as new CTO this month), but they also sponsor Slackware, and make some cool storage appliances as well as a line of servers that come with open software history and support behind them. They’ve long been a friend of BayLISA, the Silicon Valley sysadmin group I’m involved with, as well as the Bay Area FreeBSD User Group and other organizations. Check them out if you’re looking for servers, workstations, or software.

Now back to moving… why did I need a Centillion 100 again? Anybody?

[PS: Welcome to all of you who followed iXsystems over here to my blog. For full disclosure, I am currently president of BayLISA, the Silicon Valley system administration user group, but this stuff is mostly written as Robert Novak, blogger, rather than Robert Novak, BayLISA cheerleader-in-chief.]

Overkill on my morning coffee with Tonx

Some of you know I’m mildly obsessive about my coffee. I don’t hand-grind my coffee every day and I don’t own any coffee gear that costs more than a new-car car payment. But I like to make sure I have a consistent supply around, even when traveling, and sometimes I like to go out of my way for the experience.

I’ve brought in beans from Hawaii, Key West, local roasters, and occasionally local retail. I did this for my company two jobs ago, where the finance team got annoyed that a 2 pound bag of pre-ground Costco coffee didn’t last two weeks anymore. And I do it at home, of course.

The end justifies the beans

Earlier in June, I discovered the LA-based Tonx coffee service. They had a Father’s Day promo for a free Aeropress with subscription. I figured I’d give it a try, because you can never have enough Aeropresses. Ask Stephen Foskett.

Disclaimer: All the equipment and supplies in this post were purchased by me, out of my own pocket change, with no consideration given by Tonx or any other mentioned supplier or venue. Although I am hoping a few of you use my referral link so I can get a free Tonx t-shirt.

tonx-01-bag

12oz of Tonx coffee beans

Their subscription model gives you a an every-other-week shipment of either 12oz or 24oz of beans, freshly roasted in or around Los Angeles. It’s $19 and $34 per shipment, for 12oz or 24oz respectively, including shipping. You can also subscribe to a half sack (6oz for $12), and from Twitter it appears you can do a standard plus a half sack if you want something in the middle.

A bit pricy compared to grocery store or Cost Plus coffee, but competitive with boutique/specialty roasters when you take shipping into account.

Tonx roasted my shipment of Costa Rica “HELSAR DE ZARCERO” beans on June 16, and it arrived (along with the free Aeropress) while I was off in the land of heat and humidity (probably Austin at the time). When I got back, the little box with the beans and a newsletter were here, along with the Aeropress.

Introducing the dripper

tonx-03-grounds-dripper

Clever Coffee Dripper, 7T of ground coffee, and a tablespoon measure

The good folks at Red Rock Coffee in Mountain View do hand-dripped coffee for a slight premium, and when I worked next door to them, I’d go in once or twice a day for a hand-dripped coffee. They use the Clever Coffee Dripper, an twist on the typical Melitta or Hario V60 pourover funnel that you’ve probably used at some point in your life.

The difference between the Clever and a typical pourover is that your ground coffee soaks in the water for at least 4 minutes as a part of the brew cycle. You can bring out more of the flavor of your coffee this way, rather than rushing the water past the beans. When your coffee is steeping in the dripper, the stopper on the bottom is “down,” meaning that it’s closed. When you place the dripper on a cup, the rim of the cup pushes the stopper up, and the coffee flows gradually through the grounds to produce a richer flavor.

Another advantage of the Dripper over the Aeropress is that it requires a lot less arm strength first thing in the morning, since you’re only lifting the dripper, not pushing the plunger.

The Clever is available at Red Rock–if you’re in the area, go in and buy it there, and have Brendan or one of the other coffee gurus show you how it’s done. If you’re not local to Mountain View, you can either buy it on Amazon or order from Sweet Maria’s in Berkeley.

Let’s brew this thing

tonx-02-millSupplies:

  • Hario MSS-1B hand-crank grinder (or not… keep reading)
  • Clever Coffee Dripper
  • #4 funnel-style paper filter (white or natural)
  • Beans!
  • A 1T measure and a stirring stick (wood, plastic, a small spoon if nothing else is available)
  • A timer, or an eye on a clock.

My process

Grind a MSS-1B worth of beans by hand. Rough estimate suggests that this was 600 cranks of the hand crank on the grinder, and a sore left hand from holding the grinder. Result is about 7T of ground coffee, which was dumped into a finger bowl for measuring.

Heat filtered water (12oz plus a bit to rinse the filter) to almost boiling.

Put one filter into the Clever, douse it with hot water and drain, then add 2T coffee per 6oz water. In this case, 4T coffee is used for 12oz water.

tonx-04-dripper-timer

Timing the first phase of brew. 2 minutes, stir, 2 minutes, stir, release.

Pour hot water slowly over the grounds in the filter, making sure to douse all the grounds first. I let the grounds bloom a little bit before adding the rest of the water, although this is not strictly necessary.

When all the water is poured into the filter, put the cover on the dripper and start a 2 minute timer. After 2 minutes, gently stir the water and coffee with your stirring stick. Replace the cover and start another 2 minutes on the timer.

After your 4 minutes and change are done, stir one more time and then put the dripper on a mug. It will probably take at least 3 minutes to fully drain, maybe more, but be patient.

tonx-05-dripped-coffee

The end result. Darker than expected, due to finer grind than intended.

Finally, after about 20 minutes of the ritual, you’re ready to try your coffee. If, like me, you adulterate your coffee, try each new variety without sweetener or lightener. you may still adulterate it afterward, but at least you get a feel for what your beans result in.

So how were those beans?

In a word or two, pretty good.

This shipment was Helsar de Zarcero from Costa Rica. A mild roast that one blog described as “Medium, creamy body. Fresh blackberry aroma & mellow acidity. Finishing with honeycomb sweetness.”

I made one critical “mistake” in the preparation of this coffee. The Hario hand mill grinds a very fine grind, but for Clever you should generally use a coarser grind–one person I read suggested a rock salt texture, and if you’re having a professional grind your beans, ask for press pot or French press coarseness.

Still, despite the grind being very small and thus taking longer to get through the filter as the coffee bonded… I got a dark but not overwhelming brew out of the coffee. The paper filter keeps your coffee from being silty, and it came out creamy and not too acidic, as expected.

A spoon of turbinado sugar brought out a bitter tone, as I’m sure any coffee so insulted would show. A bit of half-and-half calmed it down, and I was back to my usual level of adulteration. A very smooth sipping coffee.

I had 3T of coffee left, so I brewed it in my Black & Decker 16oz pod/ground brewer with 9oz of water. This is a brewer that does wonders with coffee pods, but as a basket drip coffeemaker it didn’t really do any justice to the Tonx beans.

So where do we go from here?

First, no more hand cranking of the mill for a while. I’ll run the rest of this batch, and probably future batches, through my Pro Line burr mill from KitchenAid. Most of the time I don’t need the full-on ritual, and I do need the use of my arms.

Second, I do think I’ll keep my Tonx subscription for a while. They’re roasting my next shipment, a Valiente from Santa Ana, El Salvador, today. I should have it by the end of the week and I’ll try to comment on it when I try it.

Check them out — if you use this link, I’ll get points toward something or other, and maybe a t-shirt. They’re on twitter @tonxcoffee and elsewhere as well.

Third, I’ll probably try the Costa Rican beans in an Aeropress this week. My fiancee hides my “spare” coffee equipment in baskets on the top of our kitchen cabinets, so I’ll have to go climbing to find one that’s not new in box. As mentioned, I prefer to do Aeropress when I’m awake, as it can require a lot of pressure to brew. But it’s worth the effort, and it’s easier to travel with than Clever (although a medium handy box from Target or a hardware store can protect the Clever very well).

Disclaimer redux: All the equipment and supplies in this post were purchased by me, out of my own pocket change, with no consideration given by any supplier or venue. Links may be affiliate referrals that help pay for my coffee  habit and other adventures, and your use of them is appreciated.

What about you? Have you tried Tonx or any other specialty/micro roasters? Or have suggestions on my coffee gear and methods? Feel free to chime in on the comments below.

It’s pilgrim time, people… #vExpert #CLUS #TFD9 #rsts11

Got your best John Wayne voice in mind?

April showers bring May flowers, and what do Mayflowers bring?

Pilgrims.

vexpert-tint

First, I’m honored and (at least) a little bit surprised to have been chosen as a VMware vExpert this year. To be in the company of both Scott Lowes, and several hundred other people who contribute to the VMware community, well, it’s an amazing category to be in.

I applied under the Evangelist Path because, while I work for a company that has more than a few VMware licenses, this is a category I qualify for under my own auspices. And the blog entries you’ve read, linked to, and followed in your own labs have been out of my own pocket and without benefit of a Fortune 100 company’s sway or budget.

Thanks to some of the benefits of the vExpert program, I expect to be able to expand my home lab and work on some new projects in the coming year, meet lots of new friends and cohorts, and contribute more of another voice to the VMware community. Although I suppose this means I should follow the recommended capitalization of VMware more consistently.

TFD-Logo-300

Speaking of pilgrims, I’ll be making a pilgrimage to Austin, Texas in just over three weeks to be a part of the All-Star All-Datacenter Tech Field Day 9. I know over half of the other delegates, having participated with them on previous field day events, and am looking forward to maybe remembering all of their names by the end of the week.

This is my first field day outside of Silicon Valley (unless you count the roundtables at Interop last month), so it should be interesting to actually have to go more than a 15 minute drive to join the rest of the delegates.

Tune in June 19-21 for live coverage of our conversations with Dell, Nutanix, Solarwinds, Veeam, Neverfail, Commvault, and a top secret stealth company I’m not allowed to name yet.

Update! As of June 4th, Infinio has outed themselves as the “top secret stealth company.” They describe themselves as “inventor of downloadable storage performance” (and I assume that’s storage performance enhancement that’s downloadable rather than being hardware). Looking forward to seeing what their Infinio Accelerator is and how it compares to other things on the market that sound like software-layer virtualization storage enhancement.


cisco-live-250

And speaking of pilgrims even more, well, I’ll at least be in the neighborhood of my employer’s largest campus when I head down to Orlando after TFD9 for the Cisco Live event.

I’ve been heavily involved in Cisco UCS for the past year and change, and am looking forward to exposure to more about Cisco’s datacenter platforms as well as maybe touching on other areas of their business. I probably won’t be able to turn my Cisco 1605R routers into SDN gear anytime soon, but I’ll survive.

Balancing-Act-001

And finally, as time permits I’m going to be evaluating and writing up a couple of SMB WAN load balancing solutions that have been introduced/enhanced recently. I had good conversations with two of the bigger names in SMB WAN aggregation and failover while at Interop earlier this month, and I’m looking forward to experimenting with some of their gear in the foreseeable future. You’ll probably see some of the names in my “How many Internets do you need?” post from March, and maybe a surprise or two if I’m lucky.

So stay tuned. And if there’s anything in the SMB (small/medium business) and/or POHU (psycho-overkill-home-user) market space you’re curious about, let me know and I’ll see if I can dig into it. Chime in on the comments below!