
I seem to have volunteered to share this documentation… if I run out of other things to do, I might do a video or animation of the process. But in short, here’s how I would go about setting up and managing a blogroll (list of blogs to share) on a wordpress.com-hosted WP blog.
Note that you have to have administrative privileges to the account (as far as I know) to make this sort of changes. Also note that I’m not responsible for any damage you do to your blog, your home, your horse, or your hometown while following these steps.
First: Create a link category
Log into your admin portal for WordPress. It’s either going to be <yourblog>.wordpress.com/wp-admin or <yourblogdomain>/wp-admin
If you’re already in the <yourblogdomain>/admin interface, look on the bottom left of the screen for “WP Admin” which will take you to the same place.
Then look for the “link” logo or label (depending on how wide your browser window is) on the left, put your mouse over it, and choose “Link Categories.”

Then on the Link Categories page, give your category a name and description. Depending on your WordPress theme, the Description may or may not be shown to visitors.

Click “Add New Link Category” and it will show up on the right.

Second: Create a link or links
Go back to the Link icon on the left, and choose “All Links.” Then click “Add New” at the top.

Enter the information for the blog or link youw ant to share. Be sure to check the category you just created. I like to use _blank as the target type, so that someone can keep my blog open while checking out my friends’ blogs.

When you’re done adding links, go back to the Link icon on the left, and choose “All Links.” Look to see that your links show up in the list. If you have other links (like the stock ones from WordPress) you can choose your category and click “filter” to only show that category.

Third: Install a widget to show your blog roll
You’ll have to look at your WordPress theme to see where it makes sense to put your widget. But the Widgets menu will show you your options. Mine is in the Sidebar using the widget called “Links.”

Select your category as chosen before. You can sort alphabetically, randomly, or by Link ID if you want to force an order (you’d then have to set the Link ID in the “add links” section above, or add it later). For a typical blogroll, I’d consider a random ordering and limited number of links, so you don’t overwhelm the page but people get a reasonable chance of having their blogs show up occasionally.
If you don’t add a link image to the link, you can leave “Show Link Image” unchecked.
Fourth: Check out your shiny new blogroll
If you use the newer interface, with the “Live Optimizer” (button next to Widgets headline on the Widgets page), you can see how the page looks as you change settings. Otherwise, go to your actual blog site and look in the location you specified for your Links widget. You should see something like this:
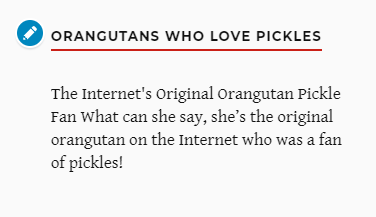
Depending on your theme, it may be hard to tell the link from the description. You might consider putting the link name in all caps, or brackets… or just let guests figure it out on their own. In this example, “The Internet’s Original Orangutan Pickle Fan” is the link, and the rest is unclickable as a description.
So where do we go from here?
If you have suggestions on link or blogroll management, or if anything in this mini-tutorial doesn’t make sense, chime in on the comments below. Note that things like theme configuration, blog setup, and so forth are way beyond the scope of this post.
